Kitchen ventilation is a critical component of any home. Proper ventilation removes cooking odors, moisture, smoke, and other airborne irritants, helping ensure clean indoor air quality and prevent issues like mold growth. This comprehensive guide covers everything you need to know about planning, installing, and maintaining effective kitchen ventilation.
Overview of Kitchen Ventilation Systems

Kitchen ventilation typically centers around range hood systems installed above the cooktop or stove. Range hoods come in several main types:
Wall-mounted range hoods
Mounted on wall behind the cooktop at least 30 inches above. Typically the most powerful option.
Island range hoods
Suspended from the ceiling over a standalone island cooktop. Require greater ceiling height.
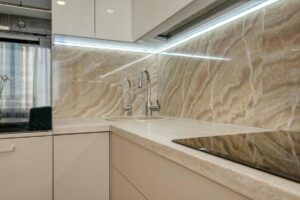
Chimney range hoods
Mounted to the bottom of upper cabinets behind the cooktop. Feature a decorative hood covering the ductwork running to the ceiling.
Downdraft range hoods
Integrated into the cooktop itself and draw air downward then run ducting along the floor or basement. Don’t require upper cabinet space.
Range hood systems use powerful fans and filters to improve indoor air quality. Key benefits include:
- Removing smoke, grease, odors, and chemicals
- Reducing moisture that promotes mold growth
- Protecting kitchen walls and cabinets from residue buildup
- Regulating kitchen temperature during cooking
Below we dig into detailed guides for selecting, installing, and maintaining all types of kitchen ventilation systems.
Essential Factors When Choosing Kitchen Ventilation
Choosing adequate kitchen ventilation involves assessing your ventilation needs, ductwork, design preferences, and budget.
Determining Your Specific Ventilation Requirements
Consider what type of cooking you routinely do and what ventilation issues you want to solve. For example, do you frequently:
- Cook pungent or smoke-producing foods?
- Use your cooktop for hours at a time?
- Cook large or complex meals?
- Struggle with excess moisture?
Features like CFM power (air flow rate), fan speeds, ducting, and filter types should match your usage and goals. High-performance options with 600+ CFM ratings, infra-red grease filters, and dedicated ductwork provide the most effective moisture and odor control.
Evaluating Required Ductwork
- Do you have existing ducts or will new installations be needed?
- Where is the nearest location to exhaust air outside (roof, side wall)?
- Flexible or rigid duct materials? Plan duct route to minimize turns that reduce airflow.
Design Factors
Consider the visual look you want and available space when selecting a style. Key aspects include:
- Finish colors: Match existing kitchen color schemes and materials
- Hood dimensions/clearances: Measure cooking surface size, ceiling heights
- Features: Lighting design, filter types, fan speeds
Wall-mounted chimney hoods offer the most flexibility in smaller kitchens while island models suit large open layouts.
Setting Your Budget
Kitchen ventilation costs vary based on the power, size, features, and installation needs, ranging from $100 basic models to $2000 commercial-grade with custom ductwork. Evaluate long-term costs like future repairs when investing in equipment.

Step-By-Step Guide to Installing Kitchen Ventilation Systems
Proper installation is critical to ensure your kitchen ventilation performs effectively.
Before Installing Your Range Hood
- Carefully measure your cooking area ceiling height and cabinets
- Inspect any existing ducts to ensure adequate capacity
- Plan new duct runs if existing ones won’t work or you lack ducting currently
- Install electrical connections or outlets if wiring upgrades are needed
Installation Process
Follow all manufacturer instructions for your specific model’s mounting mechanisms, ducting connections, and wiring. Key steps typically include:
- Unpack all parts like the hood chimney, filters, light bulbs, screws and wall anchors
- Temporarily fit components to check alignments
- Mark and drill installation screw holes
- Secure mounting screws into wall studs or use wall anchors
- Attach ductwork and insulation to exhaust port
- Connect wiring
- Re-assemble chimney components and filters
- Test all functions – lighting, fans speeds, airflow
For chimney or island models, also allow for structural adjustments like ceiling cutouts required to route ducting.
Pro Tip: Consider hiring a professional installer if your ductwork requires significant changes or your kitchen layout presents challenges.
Maintaining Peak Performance
Regular maintenance keeps kitchen ventilation working properly over decades of service.
- Monthly: Clean grease filters by hand or dishwasher. Change charcoal odor filters every 6-12 months.
- Yearly: Disassemble and deep clean hood interior and fans. Replace light bulbs as needed.
- As Needed: Check ducting for leaks causing reduced air flow. Ensure all wiring is secure.
Reviews of the Best Kitchen Ventilation Systems
We evaluated over 50 leading kitchen ventilation models across all budget ranges based on efficiency, noise levels, size constraints, and overall value. Here are our 2023 picks for top-rated kitchen ventilation hoods:
Best Ducted Range Hoods
The Cavaliere SV218Z2 series stands out for ultra quiet operation at just 0.6 sones on the lowest fan setting. Its 900 CFM maximum air movement capacity handles commercial-sized stoves. Includes brilliant halogen lighting paired with stainless steel accents.
Best Ductless Range Hoods
For smaller kitchens, the affordable Broan 413004 90 CFM ductless hood features a space-saving low profile and removable grease trays. Despite a compact size, its dual halogen lights provide ample task lighting.
Best Downdraft Range Hoods
The JennAir Noir Downdraft stands out with an integrated 18” height adjustable ventilation system seamlessly built into your cooktop or range. Its 1000 CFM maximum airflow handles even commercial-level ventilation needs in home kitchens.
Frequently Asked Questions About Kitchen Ventilation Systems
Still have questions about selecting and installing kitchen ventilation? See the answers to our most common questions below:
How Do I Calculate Required CFM Levels?
Select range hoods with CFM ratings aligned to your cooktop width:
- 30-Inch Cooktops = minimum 400 CFM
- 36-Inch Cooktops = minimum 600 CFM
- 48-Inch Cooktops = minimum 800 CFM
Also account for very frequent usage, commercial appliances, or poor existing ventilation pushing you towards higher CFM ratings.
Where Should Air From Range Hoods Exhaust?
When possible, vent air directly vertical through roof exhaust caps using rigid metal ductwork for optimal airflow. Otherwise, you can duct horizontally through exterior walls with straight runs to limit air resistance.
What Kitchen Ventilation Options Work Best For Low Ceilings?
For standard 8 foot kitchen ceilings, low-profile hoods with reduced chimney sizes paired with ductwork running tightly along the ceiling best maximize available space. Taller 10+ foot ceilings open up standard or commercial chimney vent options.
Key Takeaways on Kitchen Ventilation Systems
Effective kitchen ventilation makes a profound difference improving air quality and regulating moisture and odors produced by cooking. Investing in adequate CFM ratings matched to usage, quality materials like stainless steel, and professional installation ensures superior performance for years. Position, mount, and duct your range hood ventilation carefully during remodeling or new construction.